The more I dive into Intune, the more I’m left with a feeling of frustration from a documentation standpoint. Sure, all the resources from Microsoft are there, but you have to dig for them. There are plenty of blog posts describing how to do certain tasks within Intune, however, what I’ve found is that, in general, most blogs don’t end up providing a simple how-to from having new devices to being Autopilot enrolled and registered in Intune. This is the goal of this blog – to disseminate from start to finish how to set up Autopilot devices and enroll them into Intune in an easy step-by-step guide for IT Administrators. Recently, Microsoft introduced its Windows Autopilot program. Autopilot allows a device to be associated with your tenant before the device is ever even turned on. In essence, this gives you the ability to stage all device configurations to the device before the initial Out of the Box Experience (OOBE). In plain English, it allows IT administrators to do zero-touch deployments of new devices to end-users.
Recently, Microsoft introduced its Windows Autopilot program. Autopilot allows a device to be associated with your tenant before the device is ever even turned on. In essence, this gives you the ability to stage all device configurations to the device before the initial Out of the Box Experience (OOBE). In plain English, it allows IT administrators to do zero-touch deployments of new devices to end-users.
Three Ways to Do Zero-Touch Deployments Outlined by Microsoft:
1. User-Driven: This requires the user to sign in using their Azure Active Directory (Azure AD) credentials. This will then run through all configurations targeted to the device and the user (must be version 1809 or later).
2. White Glove: This allows a tech to tap the Windows key five times to initiate white-glove mode and pull any device configurations before shipping to a user. This is incredibly helpful if the user has limited/poor internet access or if application installs and configurations take a significant amount of time. The idea here is to have all applications and device configurations installed before receiving the laptop. This way, the initial login and time needed before the device is work-ready is reduced significantly from the end-user’s perspective. An ethernet connection is required. The device must also support TPM 2.0 and device attestation. Virtual machines aren’t supported (must be version 1903 or higher).
3. Self-Deploying Mode: This mode is limited because it’s only compatible with deployments that the device does not require user affinity. These types of deployments include a kiosk, digital signage device, or a shared device. In this scenario, all that’s needed by the user at the OOBE is to choose the language, locale, keyboard, and make a network connection (must be 1903 or higher).
For the intent of this blog, we will focus on User-driven mode.
Where to Start as an IT Admin?
Well, depending on the partner that is providing your devices, you have two options:
1. Some 3rd party vendors and Original Equipment Manufacturers (OEM’s) are willing to register the devices on your behalf. Usually, there’s an extra fee associated with this service.
2. Register the devices manually
- To register a device in autopilot, you need some information about the device. For the intent of this blog, I’ll focus on the last-mentioned tuple below. This is because obtaining the hardware hash requires accessing every device and running a PowerShell script provided by Microsoft.
- You need one of the following combinations of information:
- HardwareHash + ProductKey.
- HardwareHash + SerialNumber.
- HardwareHash + ProductKey (aka PKID) + SerialNumber.
- HardwareHash only.
- ProductKey only.
- SerialNumber + OemManufacturerName + ModelName.
- It’s important to note that the manufacturer name and model name are both case sensitive.
- Create a CSV with format of Device Serial Number, Windows Product ID, Hardware Hash, Manufacturer name, Device model
- Example using SN, OEM, and Model Name: 045372702457,,, Microsoft Corporation, Surface Laptop 3
- Login to https://endpoint.microsoft.com/
- Create an autopilot profile for the devices you will be adding https://endpoint.microsoft.com/#blade/Microsoft_Intune_DeviceSettings/DevicesEnrollmentMenu/windowsEnrollment
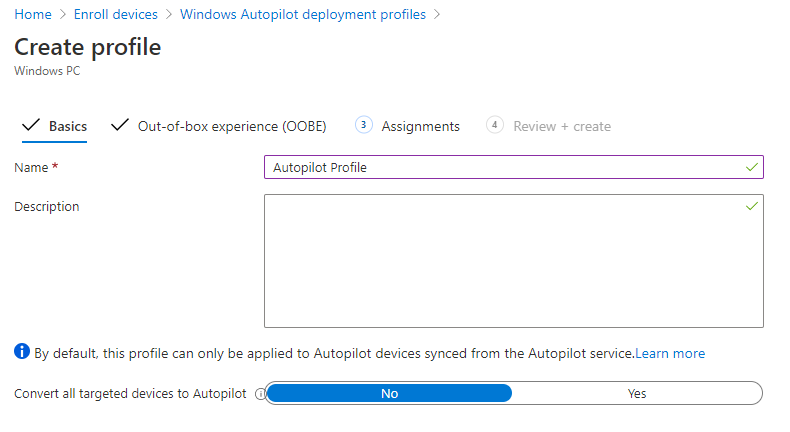
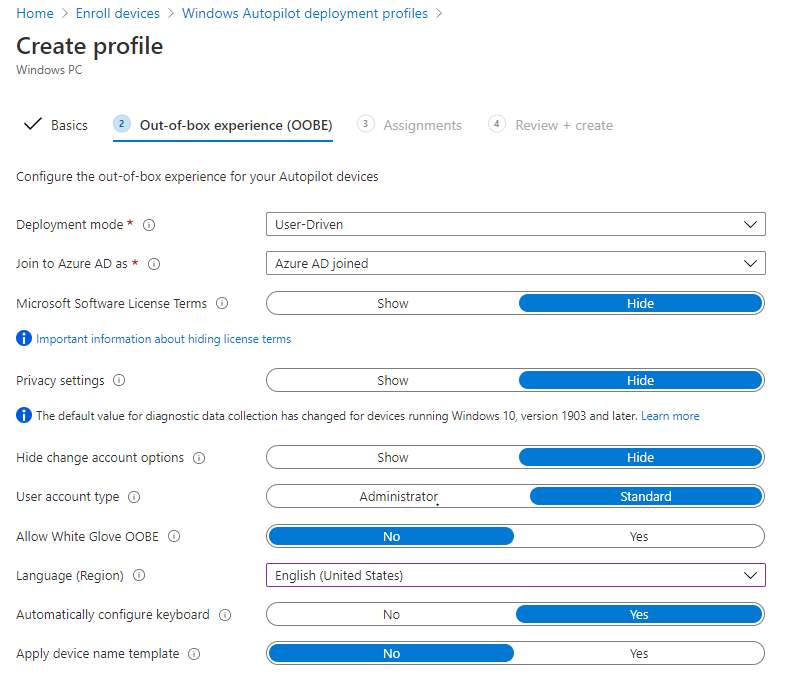
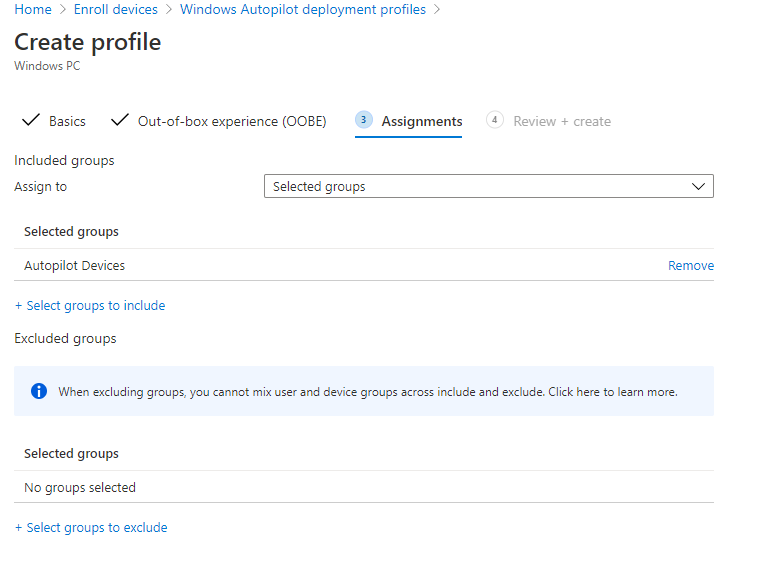
- Upload CSV and apply autopilot profile to them. Note in this case, we’ve created a dynamic group that is assigned to the profile we just created for all autopilot devices. So, once any device is imported into Autopilot it will be joined to the profile.
- Log into Azure and make sure that these devices are scoped to be able to enroll to Intune https://aad.portal.azure.com/#blade/Microsoft_AAD_IAM/ActiveDirectoryMenuBlade/Mobility
What If You Don’t Have the Information to Create the CSV?
I recently ran into this issue with a customer. We worked with a 3rd party that does three-year leases of new Surface Laptops with an option to buy out the device at the end. They don’t offer an option to import devices on the customer’s behalf, and we were never going to be able to physically get our hands on the devices before the customer received them.
However, the device serial numbers were listed on the invoice, and with some Google-fu, we found what the device model and manufacturer name would be. So, we had our tuple information.
If you want to use the last-mentioned tuple and don’t have that information, you can fire up a single device and start PowerShell.exe, run “gwmi Win32_BIOS” and “gwmi Win32_Baseboard.” This will give you the model and OEM details. Combine this information with the serial numbers provided on the invoice to complete the tuple.
Contact a member of Withum’s Advisory Services team!
We Have Our New Devices Enrolled. What About Applying Device Configurations?
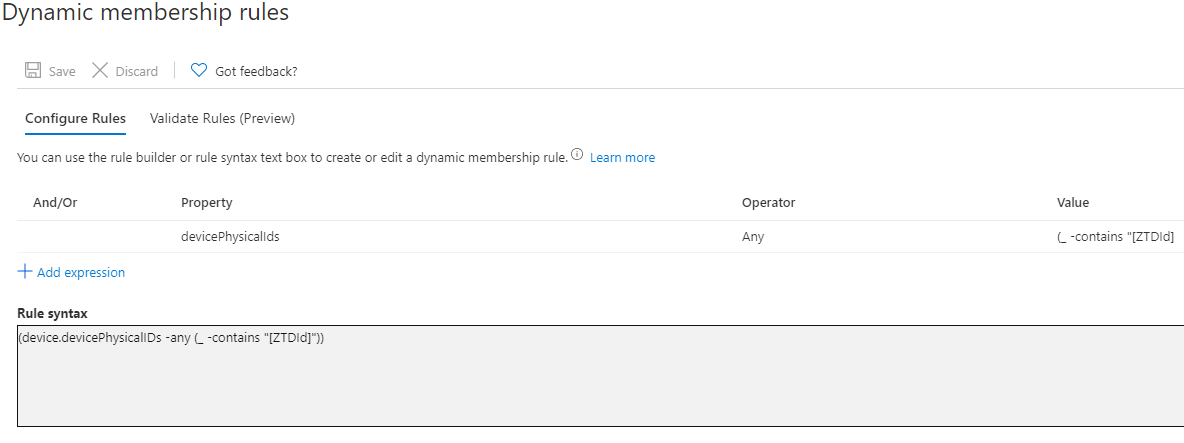
Let’s start by creating the dynamic device group to apply these configurations. Autopilot devices have a unique device attribute that is only added to devices enrolled via Autopilot. We can use this attribute to build out dynamic groups that contain only the devices we wish to target. The device identifier used is [ZTDId]. A group for devices that are all autopilot enrolled would have a rule syntax similar to the below: (device.devicePhysicalIDs -any (_ -contains “[ZTDId]”))
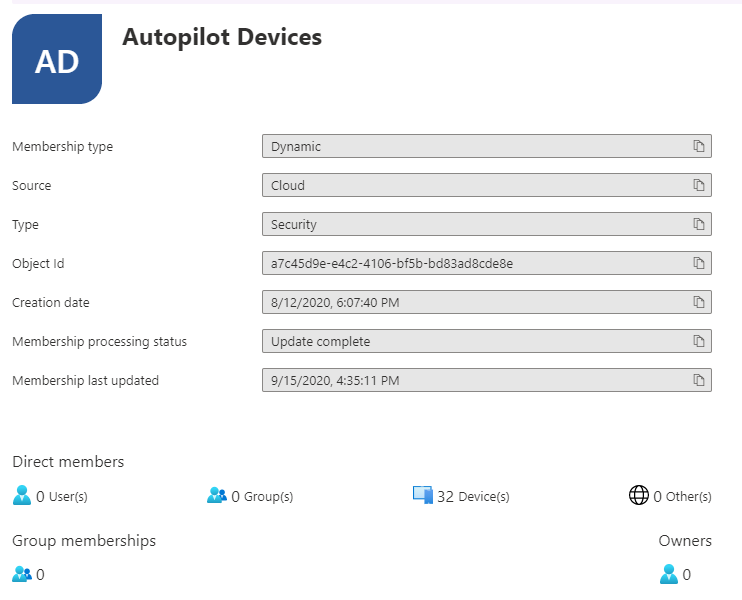
We Now Have a Dynamic Group to Use to Apply Configurations to Our Devices Through Intune. So, What’s Next?
Before these devices can be enrolled in Intune, we need to ensure that they are allowed to be enrolled. You can choose to scope this or enable all users to enroll devices into Intune. It all depends on your setup. To check this setting, login to the Azure Portal, go to Azure Active Directory, and select the Mobility (MDM and MAM) blade. From here, choose Microsoft Intune and modify the scope to your desired settings.
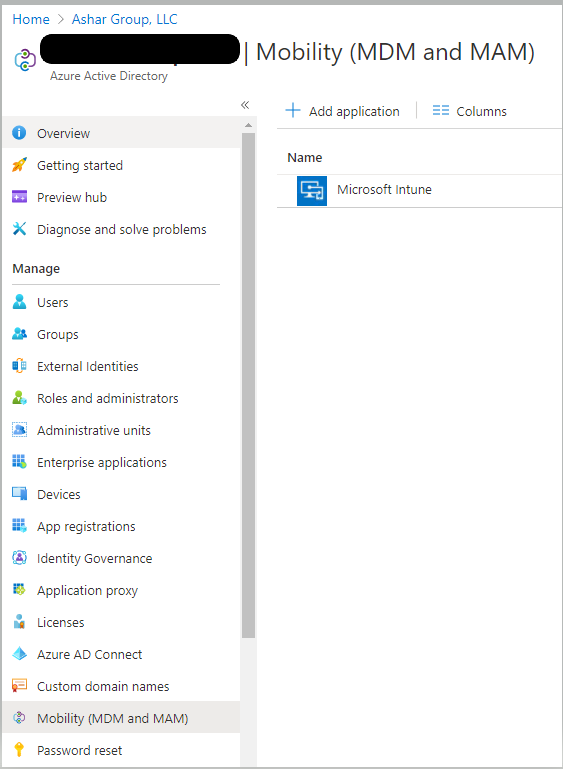
Something to note, if you intend on using MAM (Mobile Application Management) in your environment, it is crucial to scope this and not set to all users as it has a higher affinity then the MDM URL and could cause issues with Intune enrollment. I would recommend scoping it to a dynamic group that does not include any Windows 10 devices.
Congratulations, we now have all the pieces in place to do a user-driven autopilot deployment with autoenrollment to Intune to manage devices! We can now go ahead with Intune configuration and create policies that will push to the device at first log in at the OOBE. These configurations can include anything from application installs, security settings, and even network configurations.
To Recap
- We’ve enabled users to enroll into Intune
- We’ve created an Autopilot Profile
- We’ve Imported the devices and applied the Autopilot profile to the devices
Stay tuned for part two of this blog, where I show you how to deploy custom apps through Intune with Win32 App configuration deployments.
Need help understanding Intune or have additional questions? Contact a member of Withum’s Advisory Services team!
Author: Daniel Guglielmo | [email protected]
Digital and Technology Transformation


